 Fly Tying Inventory
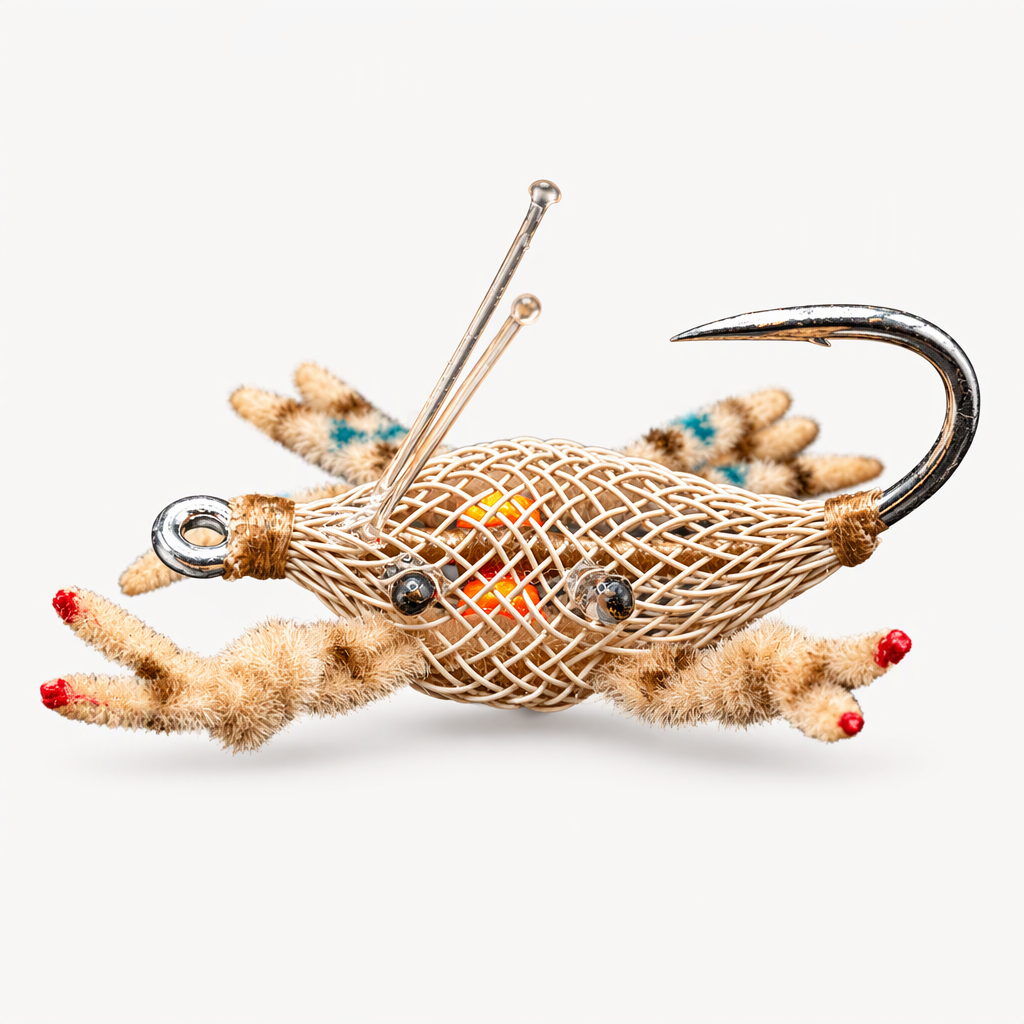
Alphlexo Crab
Alec Gerbec designed the Alphlexo Crab, a flats pattern aimed at picky permit and other flats species. A barbell sits inside a shaped mesh tube body, and chenille legs and claws are pulled through the body rather than tied to the hook. The placement of the claws and legs sets both the lifelike outline and the balance of the fly. Eyes, resin, marker color and a weed guard finish it. Tied here on a size 2/0 hook.
Ready to tie this?
This pattern needs 10 materials. Sign up free to check which ones you already own.
Materials
Gamakatsu SL12S Big Game Hook, size 2/0 (or Umpqua XS425 BN5X Baitfish Stinger, black, 2/0)
2/0
UTC Ultrathread 140 Denier, tan (or Danville 140 Denier Waxed Flymaster Plus, tan)
Tan · 140 denier
Fulling Mill Streamer Eyes Tungsten, 3.0mm, fl. orange (or Streamer Eyes Brass, 3.0mm, fl. orange)
Fl. Orange · 3.0mm
Fly Tyer's Z-Ment, for the head wraps and the leg and claw bases
Hareline Ultra Chenille, standard, tan, for the legs and claws (or Fulling Mill Super Suede Chenille, medium, tan)
Tan · Standard
Black mono eyes made at the bench (or Hareline Epoxy Mono Crab or Shrimp Eyes, black)
Black
Solarez UV Cure Resin - Thick Hard 1/2 oz
Permanent markers, to color the legs and claws
Stiff monofilament, for the weed guard
How to Tie the Alphlexo Crab
- 1
Step 1
Set the hook in the vise, start the thread and lay a base along the shank.
- 2
Step 2
Tie the barbell on top of the shank near the middle with crisscross wraps until it sits square.
- 3
Step 3
Slide a length of body tubing over the hook eye and along the shank, over the barbell, to the start of the bend. Tie it down there and trim any stray ends.
- 4
Step 4
Feed the bobbin through the mesh ahead of the barbell so the thread comes out at the front of the body. Push the tubing back on itself so it bulges over the barbell into a diamond shape, then bind it down tight just behind the hook eye.
- 5
Step 5
Trim the excess tubing, leaving a short stub, and finish the thread at the front. Touch the wraps with Z-Ment.
- 6
Step 6
Cut three lengths of chenille for the legs. The legs all go on one side of the shank and the claws and eyes on the other, so plan the spacing before you pull anything through.
- 7
Step 7
Use a leg puller to draw each length through the tubing so both ends come out on the same side of the shank. Fan the six ends evenly along that side.
- 8
Step 8
Prepare two claws from the same chenille, each with a knot at the wrist, and pull them through the opposite side of the body, one reaching toward the hook eye and one toward the bend.
- 9
Step 9
Melt the end of a short piece of mono with a lighter to form a ball, color it black with a marker and coat it with resin. Make a second eye the same way, or use premade epoxy mono eyes.
- 10
Step 10
Run the eye stems through the tubing from the hook point side near the base of each claw, so the two eyes sit side by side above the claws. Set them with UV resin, cure with a light and trim the stems once they are secure.
- 11
Step 11
Touch Z-Ment where the legs and claws enter the tubing.
- 12
Step 12
Add blue-green bands to the legs with permanent markers. Pass a lighter flame quickly along the chenille ends so they melt back and taper, then color the claw tips red.
- 13
Step 13
Set two short strands of stiff mono through the body ahead of the hook point so they stand up as a weed guard. Lock them with resin at the base and cure it.
Watch Tying Tutorial
https://www.youtube.com/watch?v=em2Ke5lklzg
Credit: Alec Gerbec / Fly Fish Food