 Fly Tying Inventory
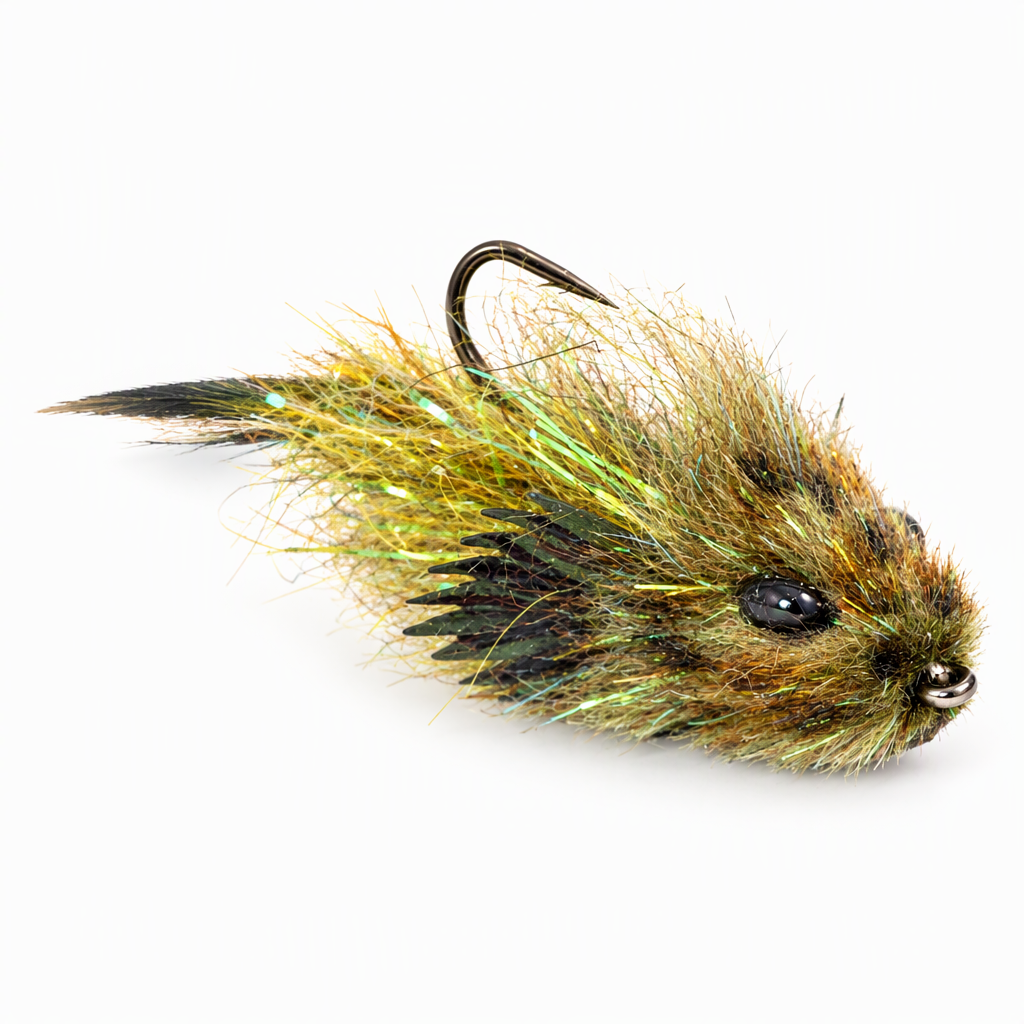
Belly Scratcher Sculpin 2.0
Cheech of Fly Fish Food updated his Belly Scratcher Sculpin with Kiley's latex Fish Finz, which replace the hand-formed fins of the original and add a tail with plenty of movement. The rear body now sits on a 20mm articulated shank dubbed with Arizona Diamond Dub, the front is built from Simi Seal and Palmer Chenille, and UV resin stiffens the underside of the trimmed head so it keeps its shape. Tungsten beads supply the weight for fishing a sculpin near the bottom of trout rivers. Tied here on a size 1 hook.
Ready to tie this?
This pattern needs 18 materials. Sign up free to check which ones you already own.
Materials
Articulated Fish Spines shank, 20mm, for the rear section
20mm
Danville Flat Waxed Nylon thread, 140 denier, black
Black · 140 denier
Veevus GSP 200D thread, black, for the head
Black · 200 denier
Kiley's Fish Finz, mottled olive, medium, for the tail and the two side fins
Mottled Olive · Medium
Arizona Diamond Dub Dubbing, bronze peacock, for the back body
Bronze Peacock
Senyo Intruder Trailer Hook Wire, black, regular, for the connection
Black · Regular
Arizona Mega Simi Seal Dubbing, dark olive, for the front body
Dark Olive
Fly Tyer's Z-Ment, for securing the wire and beads
Loon UV Clear Fly Finish Thick, for the head
Loon Fluorescing UV Clear Fly Finish, for the head
Chartpak fly tying marker, black, for shading the head
Black
Chartpak fly tying marker, celery (olive), for shading the head
Celery
Chartpak fly tying marker, delta brown (dark brown), for shading the head
Delta Brown
How to Tie the Belly Scratcher Sculpin 2.0
- 1
Step 1
Mount the 20mm shank in the vise and start the flat waxed thread at the rear.
- 2
Step 2
Dub a small ball of Diamond Dub at the rear of the shank.
- 3
Step 3
Tie the Fish Finz tail to the rear of the shank so the fin extends past the end.
- 4
Step 4
Dub Diamond Dub forward over the shank for the back body. Whip finish behind the front eye, remove the shank and pick the dubbing out.
- 5
Step 5
Mount the hook and cover the shank with thread. Pass the Senyo wire through the front eye of the tail section and bind it to the hook shank so the tail section swings freely. Leave one long end of the wire free for the beads.
- 6
Step 6
Form a dubbing loop at the rear of the hook shank and tie in the Palmer Chenille at the same point. Spin Mega Simi Seal in the loop and wrap it forward over the rear of the hook.
- 7
Step 7
Wrap the Palmer Chenille through the dubbing to the same point, tie it off and trim it. Stroke the fibers back.
- 8
Step 8
Slide the tungsten beads onto the free end of the wire, bring it forward along the top of the shank, on the side away from the point, and bind the beads down in front of the body. Secure them with tight wraps and Z-Ment, and trim the excess wire.
- 9
Step 9
Tie a Fish Finz side fin to each side of the fly at the front of the body, so each fin flares out and slightly back.
- 10
Step 10
Switch to the GSP thread. Tie in a bunch of Bruiser Blend Junior in front of the fins, spin it around the shank and pack it back tightly.
- 11
Step 11
Keep stacking and packing bunches forward to the eye, then whip finish.
- 12
Step 12
Trim the Bruiser Blend into a broad, flat sculpin head that tapers back to the body.
- 13
Step 13
Work Fluorescing UV Clear Fly Finish into the underside of the trimmed head and cure it, so the head keeps its shape.
- 14
Step 14
Shade the head with the markers, adding eyes with the black. Seal it with more Fluorescing UV Clear, then a final coat of UV Clear Fly Finish Thick, curing each coat with a UV light.
Watch Tying Tutorial
https://www.youtube.com/watch?v=Puh1dik_ISc
Credit: Cheech / Fly Fish Food