 Fly Tying Inventory
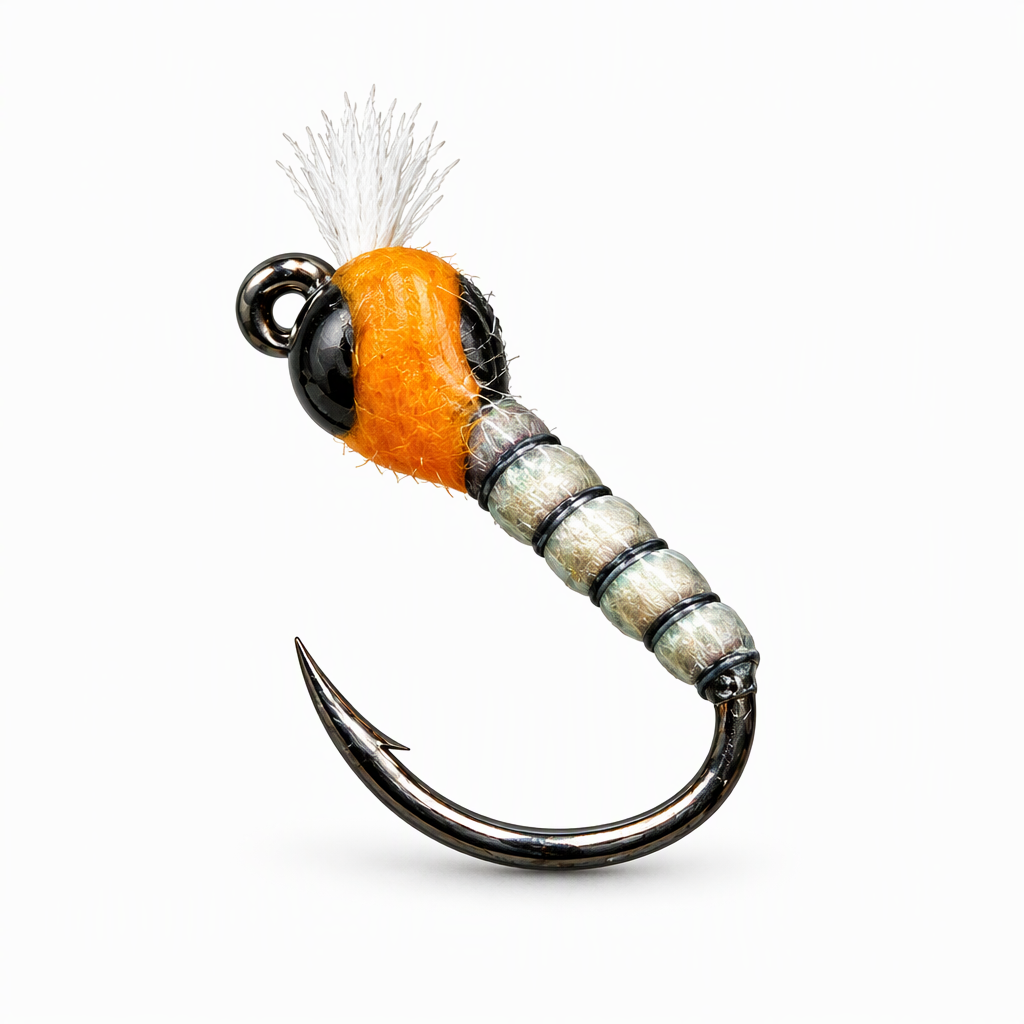
Butt Cheek Buzzer
Butt Cheek Buzzer is a chironomid pupa tied by Curtis Fry, named for the two orange resin wing buds on its thorax. The resin is durable and easy for fish to spot. Fish it as a pupa low in the water column, usually on the point of a team with flashier pupa on the upper droppers. Carry it in several weights: no bead for a weightless fly, a regular bead, and a heavier bead. Tied here on a size 12 hook.
Ready to tie this?
This pattern needs 8 materials. Sign up free to check which ones you already own.
Materials
Hanak Hooks Model 230 BL Wet Fly, H 230 BL, size 12 (or Fulling Mill 35105 Competition Heavyweight)
12
Plummeting Tungsten Beads - Painted Colors, jet black, 7/64" (2.8mm) (or 1/8" (3.3mm) for a heavier fly)
Jet Black · 7/64" (2.8mm)
Glo-Brite Floss for hot-spots and tags, fl. white no. 16, for the breathers
Fl. White · 16
Loon Fluorescing UV Clear Fly Finish, for coating the quill (or Solarez Bone Dry PLUS)
Gulff Ambulance Resin 15 ml, fl. orange, for the wing buds (or Solarez Colored UV Resin, fl. orange)
Fl. Orange
Solarez UV Cure Resin - Black Bone Dry .5 Oz, for the wing case (or Gulff Black Magic)
Black
How to Tie the Butt Cheek Buzzer
- 1
Step 1
Slide the bead onto the hook, mount the hook in the vise and push the bead back along the shank, out of the way.
- 2
Step 2
Start the thread just behind the eye and tie in a piece of white floss on top of the hook for the breathers.
- 3
Step 3
Trim the floss to a short tuft, whip finish and cut the thread.
- 4
Step 4
Slide the bead forward against the breathers and restart the thread right behind the bead.
- 5
Step 5
Peel one quill from the sheet, tie in its thin end behind the bead and bind it down along the shank to the bend.
- 6
Step 6
Wrap the thread back up to the bead in smooth turns.
- 7
Step 7
Grip the quill with hackle pliers and wrap it forward in even turns so the dark edge forms the body segments. Tie it off behind the bead and trim the excess.
- 8
Step 8
Whip finish behind the bead and cut the thread.
- 9
Step 9
Coat the quill body with a thin layer of clear UV resin, spread it with a bodkin and cure it.
- 10
Step 10
Put a small amount of orange resin on one side of the thorax right behind the bead, shape it into a wing bud and cure it.
- 11
Step 11
Turn the fly over and build a matching wing bud on the other side. Cure it.
- 12
Step 12
Use a bodkin to lay black resin over the top of the thorax between the two wing buds for the wing case, then cure it.
- 13
Step 13
Add a second touch of black resin wherever the first pass looks thin, and cure again.
Watch Tying Tutorial
https://www.youtube.com/watch?v=HqQB7SMYM9A
Credit: Curtis Fry / Fly Fish Food