 Fly Tying Inventory
C-17 Salmonfly
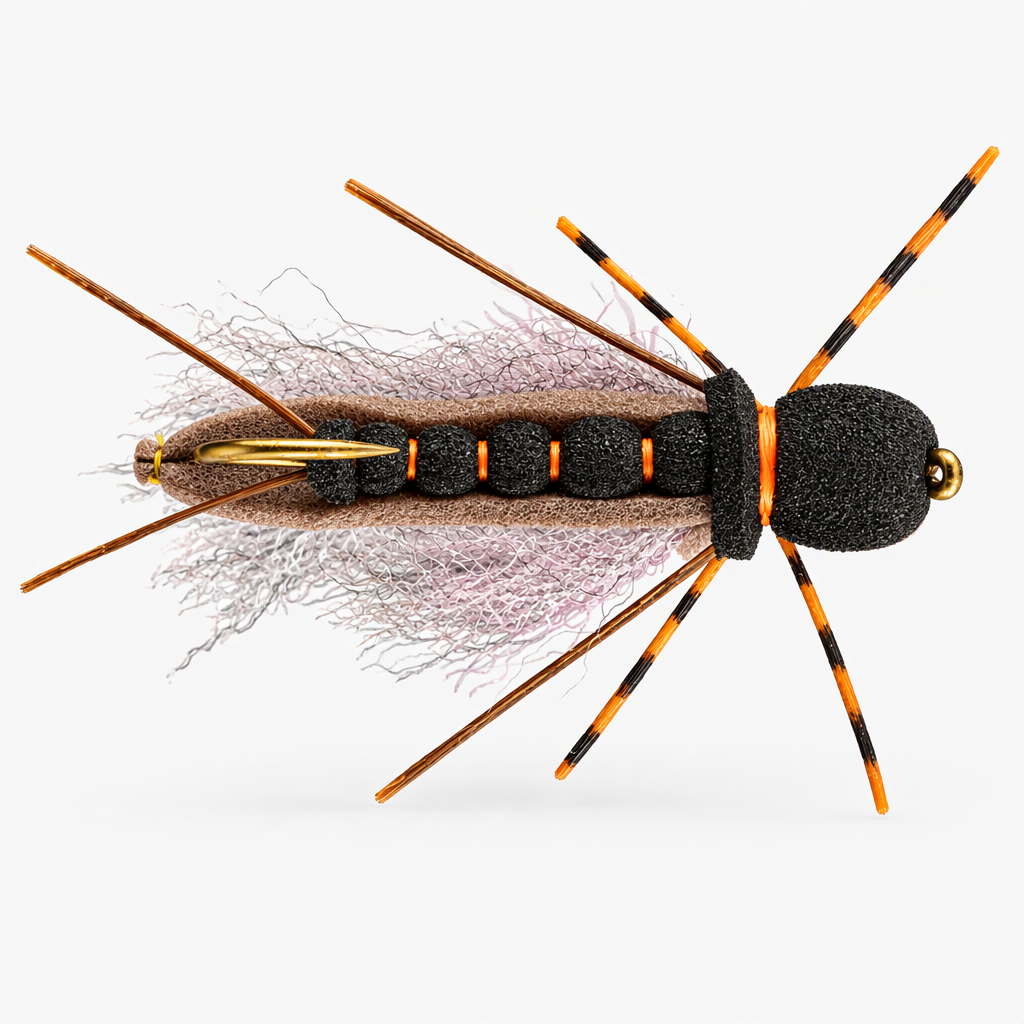
C-17 Salmonfly is a large foam stonefly dry from Cheech, made to keep working late in the hatch once trout have become wary of the usual patterns. A segmented black foam belly, a brown foam back and a layered yarn wing add some realism, and the foam can hold up a mid-sized dropper. Barred legs and an orange foam indicator finish it off. Other stonefly species can be tied the same way in different sizes and colors. Tied here on a size 2 hook.
Ready to tie this?
This pattern needs 11 materials. Sign up free to check which ones you already own.
Materials
Semperfli Classic Waxed Thread 6/0, fluorescent orange (or Danville 140 Denier Waxed Flymaster Plus, fluorescent orange)
Fluorescent Orange · 6/0
Fulling Mill Flex-Floss, black, for the tails and the rear legs (or Hareline Flex Floss, black)
Black
Hareline Hi Float Foam, 3mm, black, for the belly segments and the underside of the head (or Bug Foam 3mm)
Black · 3mm
Hareline Hi Float Foam, 2mm, brown, for the back and the top of the head
Brown · 2mm
Fly Tyer's Z-Ment, for gluing the foam back to the belly
Fulling Mill Ultra Dry Yarn, Light Dun (or EP Fibers, Minnow)
Light Dun
Fulling Mill Ultra Dry Yarn, white (or EP Fibers, white)
White
Fulling Mill Ultra Dry Yarn, Light Pink (or EP Fibers, Salmon Pink)
Light Pink
Barred Sexi Floss, medium, orange (or Speckled Centipede Legs, medium, speckled orange)
Orange · Medium
Hareline Hi Float Foam, 2mm, Sunburst Yellow Orange, for the indicator (or Bug Foam 2mm, orange)
Sunburst Yellow Orange · 2mm
How to Tie the C-17 Salmonfly
- 1
Step 1
Mount the hook in the vise and wrap the thread along the shank in open spirals back to the bend.
- 2
Step 2
Tie in black Flex-Floss at the bend for forked tails, with a strand angling out to each side. Trim the tag.
- 3
Step 3
Cut a narrow strip from the 3mm black foam and tie it in at the rear of the shank with the long end pointing forward over the eye.
- 4
Step 4
Work the strip forward in a row of segments, binding it down with a tight band of thread between each one so the foam bulges. Stop near the middle of the shank and trim the excess.
- 5
Step 5
Cut a strip of 2mm brown foam with a tapered end, long enough to reach from the front of the black segments back to the bend.
- 6
Step 6
Tie the brown strip in just ahead of the black segments with the long end pointing forward.
- 7
Step 7
Coat the underside of the brown foam with Z-Ment, fold it back over the segments and hold it in place until it grabs.
- 8
Step 8
Cut a fresh strip of each foam, 2mm brown and 3mm black. Tie the brown in on top and the black underneath just behind the eye, both pointing forward, then wrap back to the front of the body.
- 9
Step 9
Tie a bunch of Light Dun yarn on top of the shank at the front of the body so it lies back over the foam.
- 10
Step 10
Add the white yarn and then the Light Pink yarn in the same place, building up the wing. Trim the butts and shape the wing to length.
- 11
Step 11
Fold the brown foam back over the top and the black foam back underneath, and bind both down at the base of the wing to form the head and a clear waist.
- 12
Step 12
Tie a strand of black Flex-Floss to each side at the waist so it angles back. Tie a strand of Barred Sexi Floss to each side at the same point so the ends angle forward and back, then trim the legs to length.
- 13
Step 13
Tie a narrow strip of the Sunburst Yellow Orange foam on top at the waist for the indicator and trim it short.
- 14
Step 14
Whip finish at the waist and trim the thread.
Watch Tying Tutorial
https://www.youtube.com/watch?v=EEP00dar9zM
Credit: Cheech / Fly Fish Food