 Fly Tying Inventory
Glass Jig Minnow
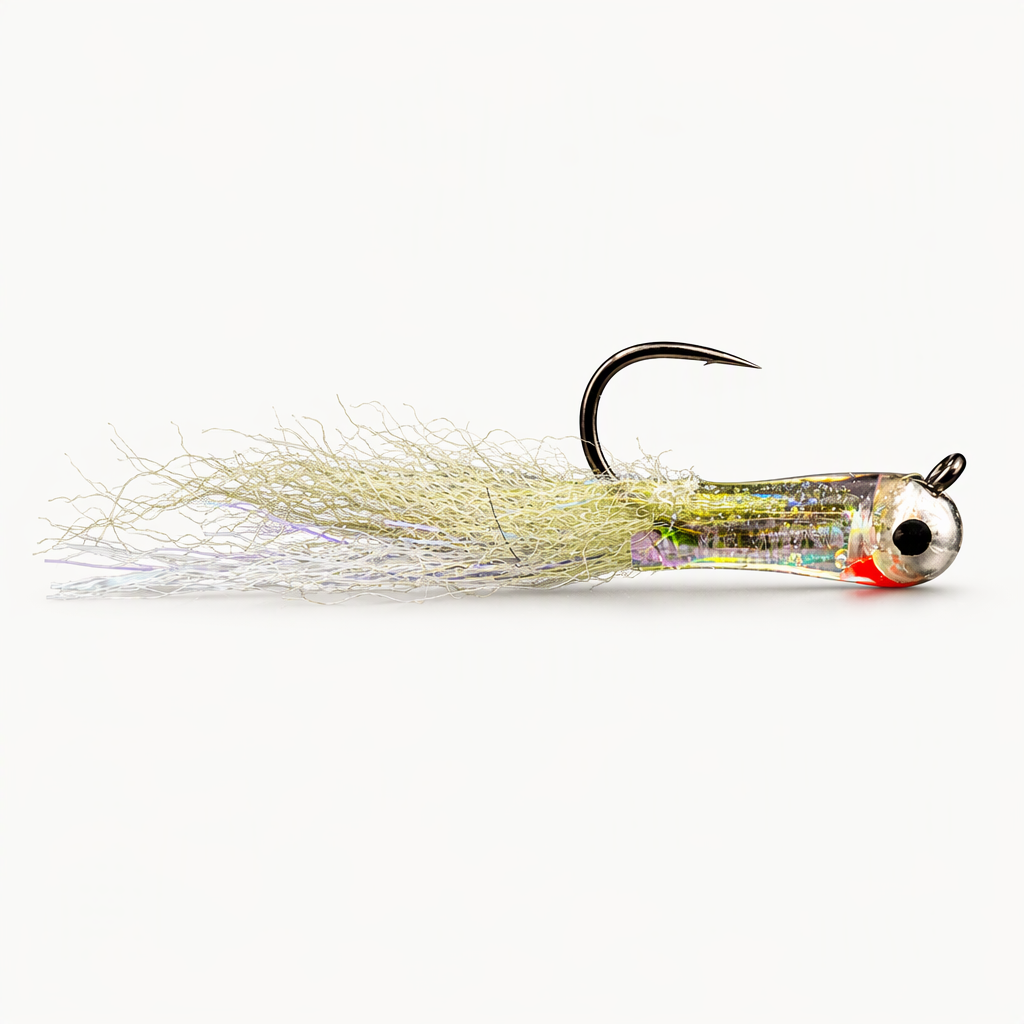
Cheech of Fly Fish Food built this tiny jig minnow around Shimmerbou, which forms a small baitfish tail with more durability and a softer flash than Krystal Flash. A slim body of Lateral Scale sealed under UV resin gives the glassy look of a fry, with a pinch of Bruiser Blend Junior over the back for color. The jig hook rides point up, and the slotted tungsten bead gets the fly down quickly. Tied here on a size 16 hook.
Ready to tie this?
This pattern needs 10 materials. Sign up free to check which ones you already own.
Materials
Fulling Mill FM5125 Jig Force Short Barbless hook, size 16 (or Umpqua XC210BL-BN Perdi-Jig)
16
Semperfli Classic Waxed Thread 12/0, white (or Danville Flat Waxed Nylon 70 denier)
White · 12/0
Fulling Mill Slotted Tungsten Beads, silver, 3.2mm (or Hareline Slotted Tungsten Beads, silver, 1/8" / 3.3mm)
Silver · 3.2mm
Flashabou Pearl Lateral Scale #1703 1/16" Wide (or pink dyed pearl #1765)
Pearl
Hareline Bruiser Blend Junior Dubbing, medium olive, for the back (or brown olive)
Medium Olive
Solarez UV Cure Resin - Medium Hard 1/2 oz, to seal the body
Red marker, for the gill mark
Red
Uni POSCA paint marker, black, for the eyes
Black
Black marker, for the back
Black
How to Tie the Glass Jig Minnow
- 1
Step 1
Slide the slotted bead onto the hook, set the hook in the vise, and start the thread behind the bead.
- 2
Step 2
Lay a smooth, thin thread base down the shank. Keep it slim, since this body is only thread, flash and resin.
- 3
Step 3
Tie in a small clump of Shimmerbou on the shank with the fibers pointing back past the bend to form a wispy tail. Bind the butts and trim any excess.
- 4
Step 4
Tie in a strip of Lateral Scale on each side of the shank behind the bead. Leave both strips long and let them trail back for now.
- 5
Step 5
Pinch a small amount of Bruiser Blend Junior and tie it in on top behind the bead so it lies back over the shank as a darker back. Comb it out so it stays sparse.
- 6
Step 6
Whip finish behind the bead and cut the thread.
- 7
Step 7
Coat one side of the body with UV resin, press the Lateral Scale strip along it, and cure. Trim the strip to the length of the body.
- 8
Step 8
Repeat on the other side so both flanks are sealed with the strip under resin.
- 9
Step 9
Darken the top of the body with a black marker, then add a small red mark on the throat just behind the bead for a gill.
- 10
Step 10
Use the POSCA paint and a fine dotting tool to set a small black eye on each side of the bead. Let the paint dry.
- 11
Step 11
Add a final thin coat of UV resin over the body and cure it.
Watch Tying Tutorial
https://www.youtube.com/watch?v=768oGRBom1E
Credit: Cheech / Fly Fish Food