 Fly Tying Inventory
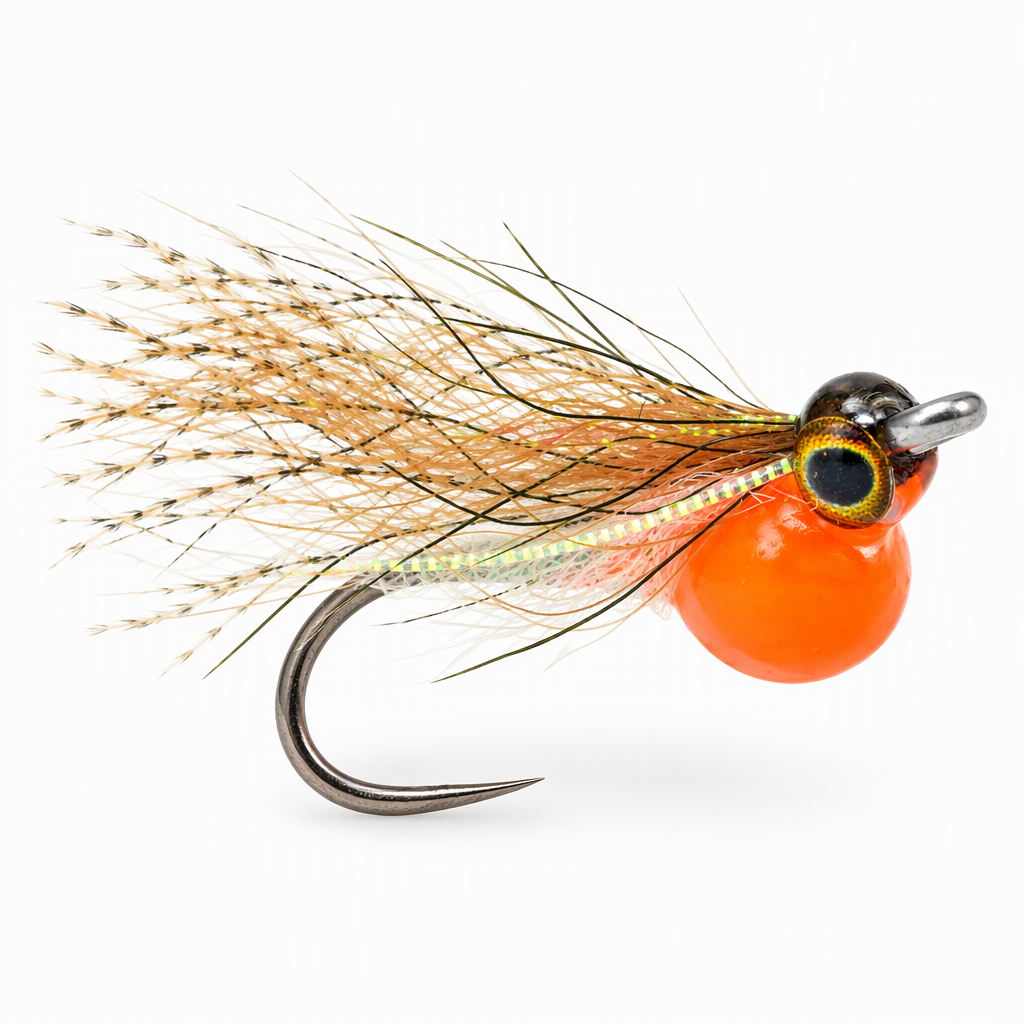
Huevo Frito
Curtis Fry's Huevo Frito imitates an alevin, a newly hatched trout or salmon fry still carrying its yolk sac. The name means fried egg, a play on the egg sac and his nickname, Frito. A tungsten bead tied in belly scratcher style sits under the shank, builds the orange sac, and keeps the sharp saltwater hook riding point up. Spring is the time to fish it where brown and rainbow trout are feeding on fry. Strip it like a small streamer, or drift it Euro style with an occasional twitch. Tied here on a size 4 hook.
Ready to tie this?
This pattern needs 10 materials. Sign up free to check which ones you already own.
Materials
Short length of stiff clear monofilament, to hold the bead below the shank
Plummeting Tungsten Beads, fluorescent orange, 5/32 inch (3.8mm), for the egg sac core
Fluorescent Orange · 5/32 inch (3.8mm)
Loon UV Clear Fly Finish Thick, for the egg sac and to set the eyes
Arctic Fisherman Blue Fox Tail Fur, white
White
Flash 'N Slinky, bronzeback
Bronzeback
Loon UV Clear Fly Finish - Flow, for the final coat
How to Tie the Huevo Frito
- 1
Step 1
Mount the hook and start the white thread. Lay a smooth thread base along the shank.
- 2
Step 2
Tie a piece of stiff clear monofilament along the shank, leaving ends free on both sides of the tie-in.
- 3
Step 3
Thread the tungsten bead onto the monofilament and form it into a tight loop so the bead stands just off the shank, about a third of the shank back from the eye. Bind the ends down and trim them.
- 4
Step 4
Turn the hook over to check that the bead hangs straight below the shank, then return the hook to its upright position for the resin work.
- 5
Step 5
Coat the bead with hot orange UV fly finish and cure it for the yolk.
- 6
Step 6
Build Loon UV Thick over the bead in layers, curing each one, until you have a rounded egg sac.
- 7
Step 7
Turn the hook over so the point is up and the egg sac hangs below the shank.
- 8
Step 8
Pull a sparse bunch of white blue fox tail fur and tie it in just behind the eye, on the point side of the shank, with the tips trailing back past the bend.
- 9
Step 9
Tie a sparse bunch of bronzeback Flash 'N Slinky on top of the fox by its middle, so half points forward past the eye and half points back.
- 10
Step 10
Fold the forward fibers back over the body and bind them down behind the eye. Whip finish and trim any stray fibers.
- 11
Step 11
Add a small amount of Loon UV Thick at the head and set a 3mm Living Eye on each side. Cure it.
- 12
Step 12
Add more UV Thick over the head and around the eyes to shape it, then cure it.
- 13
Step 13
Brush a thin coat of UV Flow over the head and cure it for a clean finish.
Watch Tying Tutorial
https://www.youtube.com/watch?v=0Rz67qkm_QE
Credit: Curtis Fry / Fly Fish Food