 Fly Tying Inventory
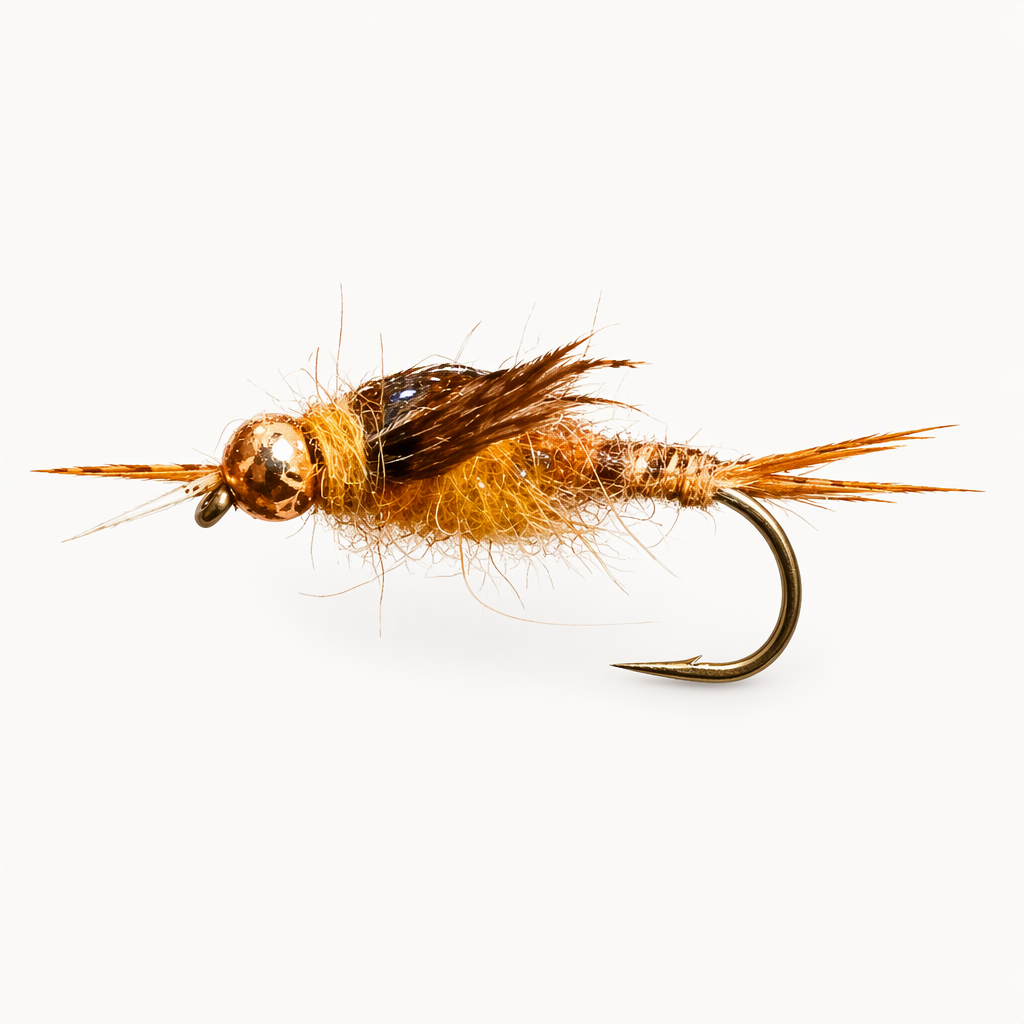
Mercer's Gold Bead Biot Epoxy Golden Stone
Mike Mercer's Gold Bead Biot Epoxy Golden Stone is a detailed golden stonefly nymph. Gold goose biots form the tails and antennae, a wound turkey biot abdomen gives clean segments, and a mottled turkey tail wing case is glossed with five-minute epoxy. Brown hen back legs and a dubbed thorax and collar finish the fly. This version stays close to the way Mercer ties it, and it takes some time at the vise. Tied here on a size 8 hook.
Ready to tie this?
This pattern needs 10 materials. Sign up free to check which ones you already own.
Materials
Tiemco 2302 Hook, size 8 (or Daiichi 1760)
8
Gold goose biots, used for both the tails and the antennae
Gold
Gold bead sized to match the hook
Gold
Yellowish-tan turkey biots for the abdomen
Yellowish tan
Brown permanent marker for shading the abdomen
Brown
Mottled turkey tail feather section
Brown hen back feather
Brown
Dubbing in the tyer's own golden stone blend, also used for the collar
Devcon 5-Minute Epoxy to gloss the wing case
How to Tie the Mercer's Gold Bead Biot Epoxy Golden Stone
- 1
Step 1
Slide the gold bead onto the hook and push it up to the eye. Start the yellow thread behind the bead and wrap a base to the bend. Tie in two gold goose biots at the bend, one on each side, so they flare apart as tails.
- 2
Step 2
Lock the bead in place with thread wraps behind it, then tie in two more gold biots just behind the bead as antennae that reach forward past the eye.
- 3
Step 3
Build a tapered underbody along the shank with thread, or with a few turns of lead wire flattened with pliers if you want weight, to give the abdomen its stonefly profile.
- 4
Step 4
Tie in a yellowish-tan turkey biot at the rear and wrap it forward in touching turns to form a segmented abdomen. Tie it off and trim.
- 5
Step 5
Shade the top of the abdomen with a brown marker to add contrast to the segments.
Optional, but it helps the biot segments stand out.
- 6
Step 6
Tie in a section of mottled turkey tail on top at the front of the abdomen for the wing case, pointing back over the body.
- 7
Step 7
Tie in a brown hen back feather over the thorax so its fibers lie along the sides as legs.
- 8
Step 8
Dub the thorax with the blend, working it between and around the legs.
- 9
Step 9
Pull the turkey tail section forward over the thorax and legs, tie it down behind the bead and trim the excess.
- 10
Step 10
Mix a small amount of Devcon 5-Minute Epoxy and spread a thin coat over the wing case. Let it set before continuing.
Keep the epoxy off the legs and dubbing.
- 11
Step 11
Dub a small collar behind the bead, whip finish and trim the thread. Brush out the collar lightly.
Watch Tying Tutorial
https://www.youtube.com/watch?v=sHM1SqasgJE
Credit: Uncle FlyFish