 Fly Tying Inventory
Mousey McMouseface
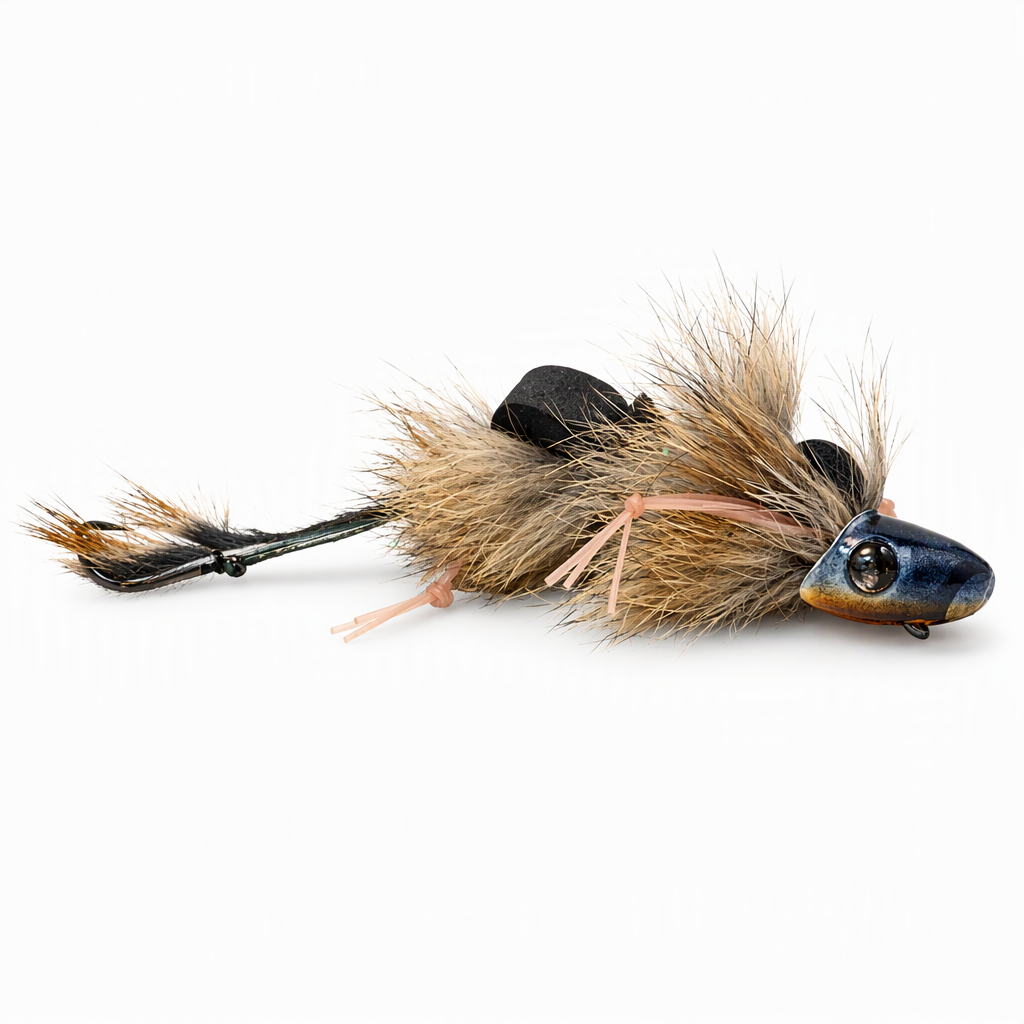
Mousey McMouseface is a Cheech design from Fly Fish Food, refined with feedback from testers Cortney Boice and Sam Parkinson. The body swims on a wire joint, with pine squirrel for a soft, buggy outline and foam humps plus a foam popper head for float. A stinger hook sits close behind the tip of the tail to catch fish that nip at the back end. Swim it across the surface for big brown trout and bass. A soft head coat, not resin, protects the foam and the marker colors. Tied here on a size 1 front hook with a size 2 trailer.
Ready to tie this?
This pattern needs 16 materials. Sign up free to check which ones you already own.
Materials
Fulling Mill FM6040 Streamer Stripper hook, size 1, for the front (or Gamakatsu B10S, size 1/0)
1
Articulated Fish Spines shank, 15mm
15mm
Braided line, for joining the stinger to the shank
Fly Tyer's Z-Ment, for securing thread wraps
Pine Squirrel Skin - Zonked, natural, for the tail and the body (or grizzly rabbit zonker strips for the body)
Natural
Double Barrel Popper Bodies, medium, white, colored with markers (or black, left uncolored)
White · Medium
Copic Sketch marker, gray
Gray
Chartpak Fly Tying Marker, Desert Tan
Desert Tan
Chartpak Fly Tying Marker, black
Black
Loon UV Clear Fly Finish Thick, 1/2 oz, for the eyes
How to Tie the Mousey McMouseface
- 1
Step 1
Clamp the trailer hook in the vise and start the thread on its shank.
- 2
Step 2
Tie a long piece of braided line to the hook shank and leave the long end free to reach the shank later.
- 3
Step 3
Tie a small tuft of pine squirrel on the hook shank to dress the stinger, which should end up close behind the tip of the tail. Whip finish and remove the hook.
- 4
Step 4
Clamp the 15mm shank in the vise and start the thread. Bind the braided line along the shank so the stinger trails behind it, then secure the wraps with Z-Ment.
- 5
Step 5
Tie a pine squirrel strip on the shank so the fur runs back along the braid and its tip ends just ahead of the stinger. This is the tail.
- 6
Step 6
Tie a second pine squirrel strip in at the rear of the shank and wrap it forward, stroking the fur back as you go. Tie it off and trim the excess.
- 7
Step 7
Tie in a strip of 6mm black foam at the front of the fur with the free end pointing back. Tie a few tan flutter legs on each side at the same point.
- 8
Step 8
Fold the foam forward, bind it down behind the eye and trim it to leave a rounded hump. Whip finish and take the section out of the vise.
- 9
Step 9
Clamp the front hook in the vise and wrap thread along the shank.
- 10
Step 10
Tie the trailer hook wire to the hook shank, run it through the eye of the rear section and bind it back along the shank so the rear section swings freely. Trim the wire and add a little Z-Ment.
- 11
Step 11
Build the front section the same way as the rear, with a wrapped pine squirrel strip, flutter legs and a folded foam hump.
- 12
Step 12
Wrap one more short pine squirrel strip behind the eye for a full collar, then tie it off and trim.
- 13
Step 13
Seat the popper body on the front of the hook so the eye sits underneath it, and fix it in place with Z-Ment.
The line ties in under the head on this style of topwater, which is what makes it move the way it does.
- 14
Step 14
Color the head with the gray and tan markers and draw the eyes in black. Dome the eyes with UV Clear Fly Finish Thick and cure it.
- 15
Step 15
Brush a coat of Loon Soft Head over the whole head and let it dry.
Hard resin suits a soft foam head poorly. Soft Head protects the foam and the marker color.
Watch Tying Tutorial
https://www.youtube.com/watch?v=QNLPehrFaJ8
Credit: Cheech / Fly Fish Food