 Fly Tying Inventory
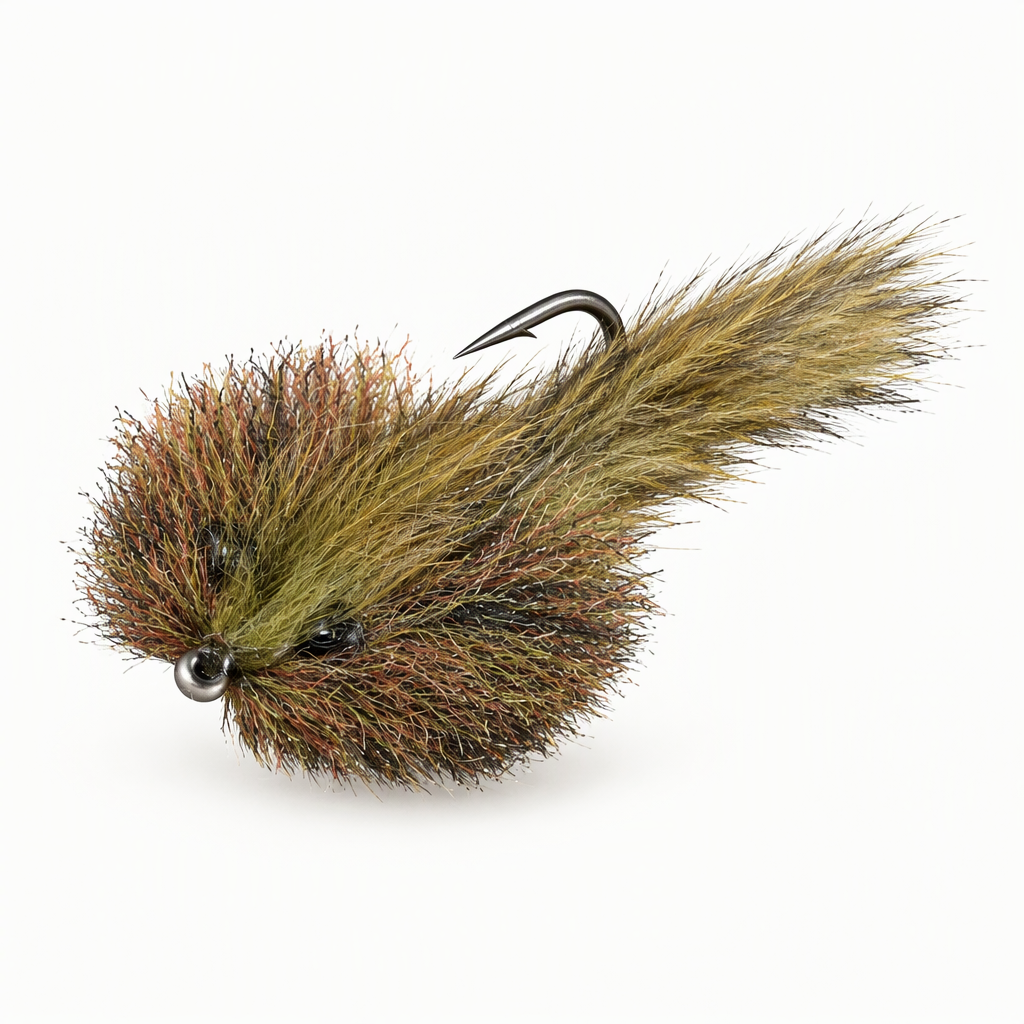
Sculpin Toad
Cheech of Fly Fish Food developed this streamer from a rough Iron Fly contest entry that was part sculpin and part Tarpon Toad. Hand-blended EP Fibers are stacked and then trimmed into a wide, flat sculpin shape, and a Magnum rabbit strip gives it a long swimming tail. Tungsten beads carried on wire add the weight. It is a trout streamer that proved itself on a float down the Green River, and the blend of olive, brown and black can be changed to match local sculpins. Tied here on a size 1 hook.
Ready to tie this?
This pattern needs 12 materials. Sign up free to check which ones you already own.
Materials
Danville Flat Waxed Nylon thread, 140 denier, olive
Olive · 140 denier
EP Fibers, olive, blended by hand
Olive
EP Fibers, brown, blended by hand
Brown
EP Fibers, black, blended by hand
Black
Senyo Intruder Trailer Hook Wire, black, regular, to carry the beads
Black · Regular
Plummeting Tungsten Beads, gold, 3/16" (4.6mm) (or Tungsten Bomb Beads, gold, the 100 pack of the same size)
Gold · 3/16" (4.6mm)
Fly Tyer's Z-Ment, for securing the wire and beads
How to Tie the Sculpin Toad
- 1
Step 1
Cut lengths of olive, brown and black EP Fibers. Pull the bundle apart and stack it back together by hand, repeating until the colors are evenly mixed.
- 2
Step 2
Comb the blend straight and divide it into small bunches, so the fibers are ready before you start at the vise.
- 3
Step 3
Mount the hook, start the thread and wrap back to the bend. Tie in a small bunch of the blend with the gold Polar Flash for a short tail.
- 4
Step 4
Tie a length of the Senyo wire to the shank at the rear of the fly, leaving the long end free. Lock the wraps with a touch of Z-Ment.
- 5
Step 5
Tie in a bunch of the blend, working all the way around the shank so the fibers flare and stand out. Push it back against the tail.
- 6
Step 6
Keep adding bunches one at a time, working forward and pressing each one back against the last, until the rear of the fly is dense.
- 7
Step 7
Slide the tungsten beads onto the wire, bring the wire forward and bind the beads down toward the front of the shank. Secure them with tight wraps and Z-Ment, then trim the excess wire.
- 8
Step 8
Continue tying in bunches of the blend around the beads and ahead of them, keeping the fibers packed tight.
- 9
Step 9
Cut a length of Magnum rabbit strip and tie it in near the front of the fly on the hook point side. Let the strip lie back along the body and run well past the bend for the tail.
- 10
Step 10
Finish any remaining space up to the eye, then whip finish and cut the thread.
- 11
Step 11
Trim the EP Fibers with scissors into a wide, flat sculpin shape that tapers toward the tail. Take off a little at a time, and keep the rabbit strip clear of the blades.
- 12
Step 12
Part the fibers at the head and apply hot yellow UV Fly Finish, then cure it with a UV light.
- 13
Step 13
Add a spot of black UV Fly Finish on each side of the head for the eyes and cure it.
Watch Tying Tutorial
https://www.youtube.com/watch?v=hrJxdIbd6H8
Credit: Cheech / Fly Fish Food