 Fly Tying Inventory
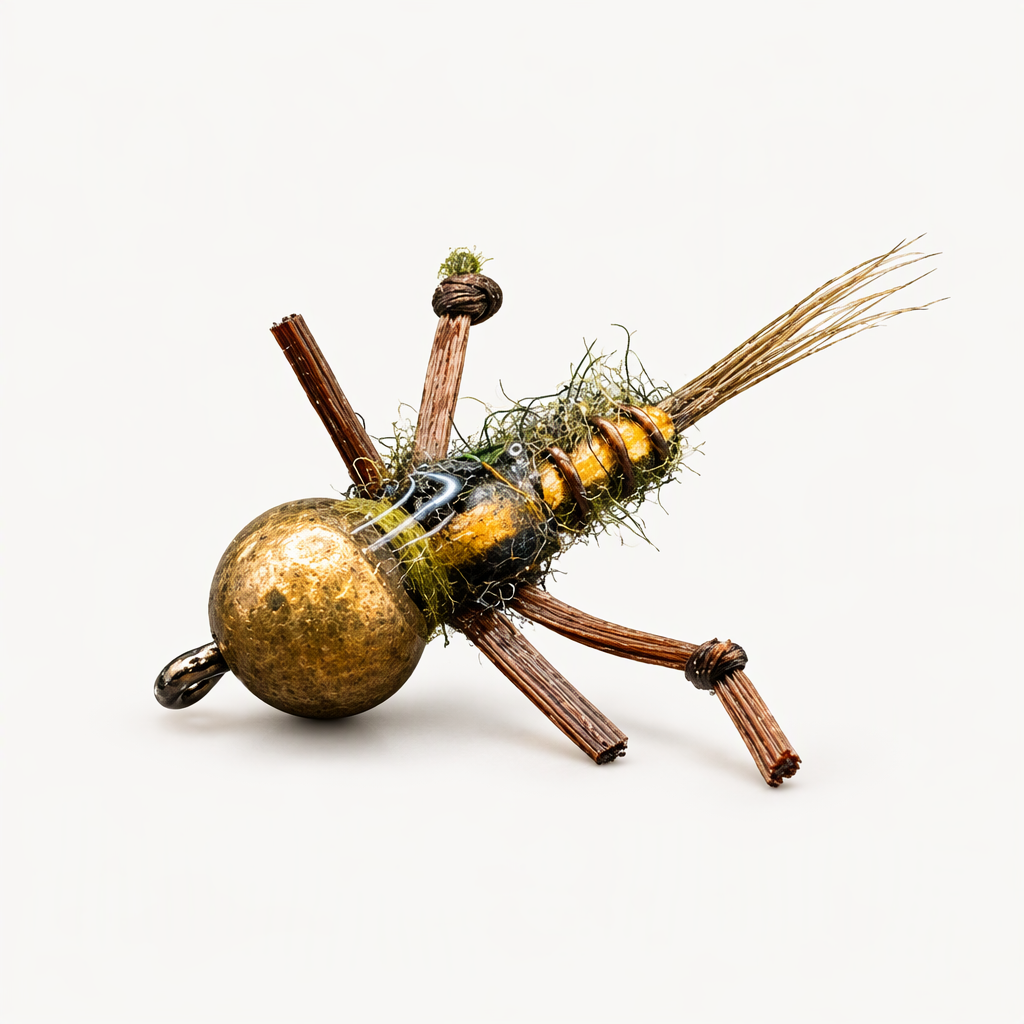
Tiny Turtle Drake
Brig's Tiny Turtle Drake imitates the big Green Drake nymphs he grew up finding under river rocks in Eastern Idaho. The first versions were much slimmer, but comparing the fly side by side with the naturals led him to a noticeably fuller profile. A slotted tungsten bead on a jig hook takes it down, and a floss dorsal line, knotted legs and a scud skin wing case finish the shape. He fishes it all year on any river that holds Green Drakes, and ties it in several sizes and colors. Tied here on a size 12 hook.
Ready to tie this?
This pattern needs 12 materials. Sign up free to check which ones you already own.
Materials
Fulling Mill 5045 Jig Force Barbless hook, size 12 (or Umpqua XC400BL-BN)
12
Fulling Mill Slotted Tungsten Beads, old gold, 3.8 mm (or Hanak Metallic+ Slotted Tungsten Beads, rouge gold, 4.0mm)
Old gold · 3.8 mm
Ringneck pheasant tail, olive (or Nature's Spirit Ringneck Pheasant Center Tails, olive)
Olive
UTC Ultra Wire, medium, Sculpin Olive (or Semperfli Tying Wire, 0.3, March Brown)
Sculpin Olive · Medium
Fulling Mill Flex-Floss, fluorescent white, for the ecdysial line along the back (or fluorescent peach)
Fl. White
Orange permanent marker, to color the ecdysial line
Orange
Semperfli Dirty Bug Yarn, Dirty Dark Olive (or Dark Olive)
Dirty Dark Olive
Fulling Mill Scud Skin, micro 3mm, brown (or olive brown)
Brown · Micro 3mm
Fulling Mill Flex-Floss, BWO (or Barred Sexi Floss, medium, olive)
BWO
Fulling Mill Tactical Microflash Dub, Bronze Peacock (or Tactical Microflash Dub UV, UV Dark Brown)
Bronze Peacock
Loon UV Clear Fly Finish Thin, 1/2 oz
How to Tie the Tiny Turtle Drake
- 1
Step 1
Slide the slotted bead onto the jig hook and mount the hook in the vise.
- 2
Step 2
Start the thread behind the bead, trim the tag, and wrap a base back to the bend.
- 3
Step 3
Tie in a small bunch of pheasant tail fibers at the bend for a short, splayed tail. Bind down the butts and trim any excess.
- 4
Step 4
Tie in the wire at the base of the tail and let it hang behind the hook.
- 5
Step 5
Color a length of the white floss with the orange marker. Tie it in on top at the base of the tail and keep it trailing back out of the way.
- 6
Step 6
Tie in the Bug Yarn at the bend and wrap it forward to build a full abdomen, stopping short of the bead to leave room for the thorax.
- 7
Step 7
Pull the floss forward along the top of the abdomen and tie it down at the front. Spiral the wire forward over the body and floss, then tie off and trim the wire.
- 8
Step 8
Fold the remaining floss back over the abdomen and hold it out of the way. Tie in a strip of scud skin on top at the front of the abdomen, trailing back, for the wing case.
- 9
Step 9
Cut lengths of the leg floss and tie a knot in each to form jointed legs.
- 10
Step 10
Tie two knotted legs in along each side of the thorax area and trim any excess.
- 11
Step 11
Dub the thread with Tactical Microflash Dub and wrap a thorax around the base of the legs up to the bead.
- 12
Step 12
Pull the scud skin forward over the top of the thorax, tie it down behind the bead, and trim the excess.
- 13
Step 13
Pull the floss forward over the center of the wing case, tie it down behind the bead, and trim the excess.
- 14
Step 14
Whip finish behind the bead and trim the thread. Brush thin UV resin over the wing case and cure it.
Watch Tying Tutorial
https://www.youtube.com/watch?v=Zns1szOiWcU
Credit: Brig / Fly Fish Food