 Fly Tying Inventory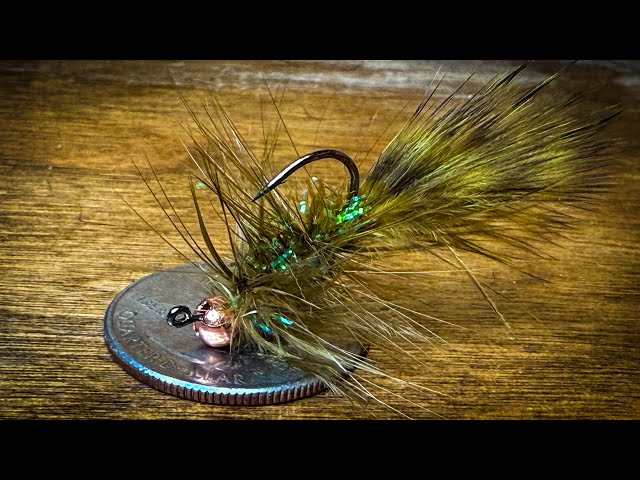
Tungsten Jighead Bugger
Red's Fly Shop's take on the universal trout fly, calling it potentially the best fly of all time. This jigged version of the classic woolly bugger rides hook-point up on a jig hook with a tungsten bead, making it incredibly versatile and nearly snag-proof. It imitates stonefly nymphs, leeches, baitfish, crayfish, and more. The jig presentation adds a unique jigging action that standard buggers lack, making it deadly when dead-drifted, swung, or stripped.
🪶 Ready to tie this?
This pattern needs 8 materials. Sign up free to check which ones you already own.
Materials
Jig hook (60-degree), sizes 6-12
Slotted tungsten bead, black or copper, sized to hook
Black 6/0 or 7/0 (140 denier)
Marabou plume, black or olive, with 2-3 strands of Flashabou
Medium chenille, color-matched to tail
Copper or silver wire, medium
Saddle hackle or schlappen, palmered through body
UV Ice Dub or similar flash dubbing behind bead
How to Tie the Tungsten Jighead Bugger
- 1
Step 1
Slide slotted tungsten bead onto jig hook and mount in vise. Start thread and secure the bead.
The slotted bead sits perfectly on the jig hook shank to maintain the inverted hook point.
- 2
Step 2
Tie in a full marabou tail at the bend, about one shank-length long. Add 2-3 strands of Flashabou to each side of the tail.
- 3
Step 3
Tie in wire rib and a saddle or schlappen hackle feather at the base of the tail.
- 4
Step 4
Tie in chenille and wrap forward in even turns to form the body, leaving room for the collar behind the bead.
- 5
Step 5
Palmer the hackle forward through the chenille body, spacing wraps evenly. Tie off and trim.
Stroke the hackle fibers rearward as you wrap to keep them from getting trapped under subsequent wraps.
- 6
Step 6
Counter-wrap the wire rib forward through the hackle to reinforce it. Tie off and break wire.
- 7
Step 7
Dub a small collar of UV Ice Dub behind the bead for added flash and attraction. Whip finish and cement.
Watch Tying Tutorial
https://www.youtube.com/watch?v=Ixij99TJTEY
Credit: Red's Fly Shop