 Fly Tying Inventory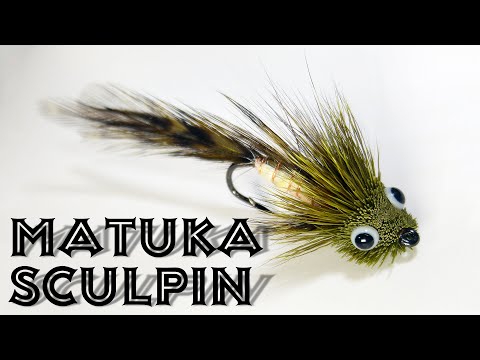
Whitlock Matuka Sculpin
Dave Whitlock's realistic sculpin imitation combining the Matuka-style wing with a spun and clipped deer hair head. This tutorial covers feather pairing for the Matuka wing, color layering, and deer hair sculpting to create a lifelike bottom-dwelling baitfish pattern.
🪶 Ready to tie this?
This pattern needs 8 materials. Sign up free to check which ones you already own.
Materials
4X-6X long streamer hook, size 2-8 (e.g., TMC 9394 or Daiichi 1750)
Olive 3/0 or 6/0
Lead or lead-free wire, wrapped along shank
Medium copper or gold wire
Pale yellow or olive SLF dubbing (minnow belly)
Matched olive grizzly or Cree hackle feathers (4 pairs), tied Matuka-style
Ringneck pheasant back feathers, matched pair
Spun and clipped deer body hair: olive, brown, cream, and black blended
How to Tie the Whitlock Matuka Sculpin
- 1
Step 1
Wrap the hook shank with lead wire for weight, leaving room at the front for the deer hair head. Cover with thread wraps to secure.
- 2
Step 2
Tie in copper wire for ribbing at the rear. Dub a pale yellow body from rear to the thorax area.
- 3
Step 3
Select and match 4 pairs of olive grizzly hackle feathers. Align them and tie in Matuka-style along the top of the body so they form the tail and dorsal wing.
- 4
Step 4
Spiral the ribbing wire forward through the hackle feathers, binding their stems to the body. This is the hallmark Matuka technique.
Wind the wire between the hackle barbs, not over them, to keep the wing looking natural.
- 5
Step 5
Tie in matched pheasant back feathers flat on each side as pectoral fins.
- 6
Step 6
Spin clumps of blended deer hair at the head, packing tightly. Alternate colors (olive, brown, cream, black) to create a mottled sculpin appearance.
- 7
Step 7
Trim the deer hair to a broad, flat sculpin-head shape using a razor blade and scissors.
- 8
Step 8
Optionally glue on doll eyes to each side. Whip finish and apply head cement to secure the thread.
Watch Tying Tutorial
https://www.youtube.com/watch?v=4TuL5_f_xwg
Credit: Dave Whitlock / FFI Fly Tying Skills Award Program (Gold Award)