 Fly Tying Inventory
Zug Bug
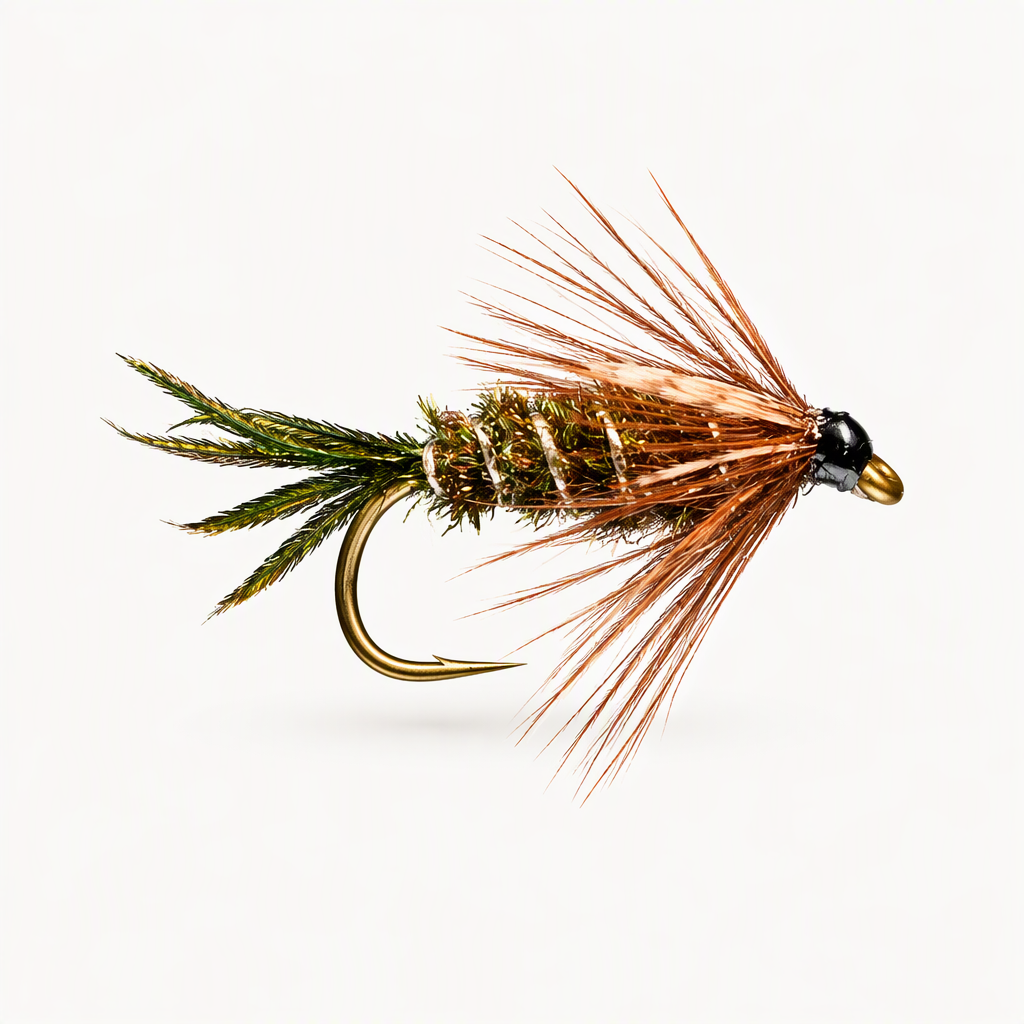
Cliff Zug of West Lawn, Pennsylvania tied the Zug Bug in the 1930s, most likely as a cased caddis imitation, and its peacock herl body, silver rib, soft brown hackle and short mallard wingcase also pass for mayfly and small stonefly nymphs. It is the older cousin of the Prince Nymph. Dead-drift it near the bottom in rivers or strip it slowly in lakes; this version is tied the original way, weighted with lead wire rather than a bead.
Ready to tie this?
This pattern needs 10 materials. Sign up free to check which ones you already own.
Materials
Lead wire, .015 inch (about 12 turns)
.015 inch
Peacock sword fibres
Natural
Oval tinsel, silver, small
Silver · Small
Peacock herl from an eyed quill, 4-5 strands
Natural
Whiting hen cape feather, brown
Brown
Mallard flank, natural
Natural
Zap-A-Gap super glue (thin coat under the herl)
Solarez Bone Dry UV resin (to coat the head)
How to Tie the Zug Bug
- 1
Step 1
Wrap about a dozen turns of .015 lead wire around the middle of the shank, leaving two and a half to three eye-lengths of bare shank behind the eye. Break off the ends.
- 2
Step 2
Start the thread behind the eye, cross over the lead to the bend, and build a small thread dam at each end of the wire to lock it in place and give the body a smooth taper.
- 3
Step 3
Even the tips of a small clump of peacock sword fibres and tie them in at the bend as a tail about half a shank long. Bind the butts up to the back of the lead and trim.
- 4
Step 4
Tie in a length of small oval silver tinsel at the front of the lead and bind it along the side of the shank back to the base of the tail.
- 5
Step 5
Tie in four or five strands of peacock herl at the tail, then brush the thinnest possible coat of Zap-A-Gap over the thread underbody to make the herl more durable.
- 6
Step 6
Wrap the herl forward into a full, chunky body that stops a couple of eye-lengths behind the eye. Tie it off and trim; if you like, snip the herl lightly to shape a taper.
Herl from an eyed quill is usually fuller and stronger than strung herl.
- 7
Step 7
Spiral the oval tinsel forward through the herl in four or five open turns, tie it off at the front and trim it.
- 8
Step 8
Choose a brown hen feather with fibres one and a half to two hook gaps long. Cut off the butt, snip a few fibres from each side of the stem to leave a short stubble for grip, tie it in by the stem and fold the fibres back by drawing the feather through wet fingertips.
- 9
Step 9
Wrap the hackle two or three turns in front of the body, tie it off and trim the stem. Pinch the fibres down and back, then take a few thread wraps over their base so they sweep back as a wet-fly collar reaching about to the hook point.
- 10
Step 10
Strip the fluff from a mallard flank feather, lay the tip section flat over the top of the fly so it cups over the upper half of the body, and tie it down with firm wraps. Lift the butt, wrap in front of it, then fold the stem back and bind it again for strength before trimming it.
- 11
Step 11
Whip finish, trim the mallard tip square so the wingcase covers roughly the front third of the body, and coat the head with Bone Dry UV resin and cure it.
Watch Tying Tutorial
https://www.youtube.com/watch?v=Ge9lyKPee7M
Credit: Charlie Craven